Description
Frames
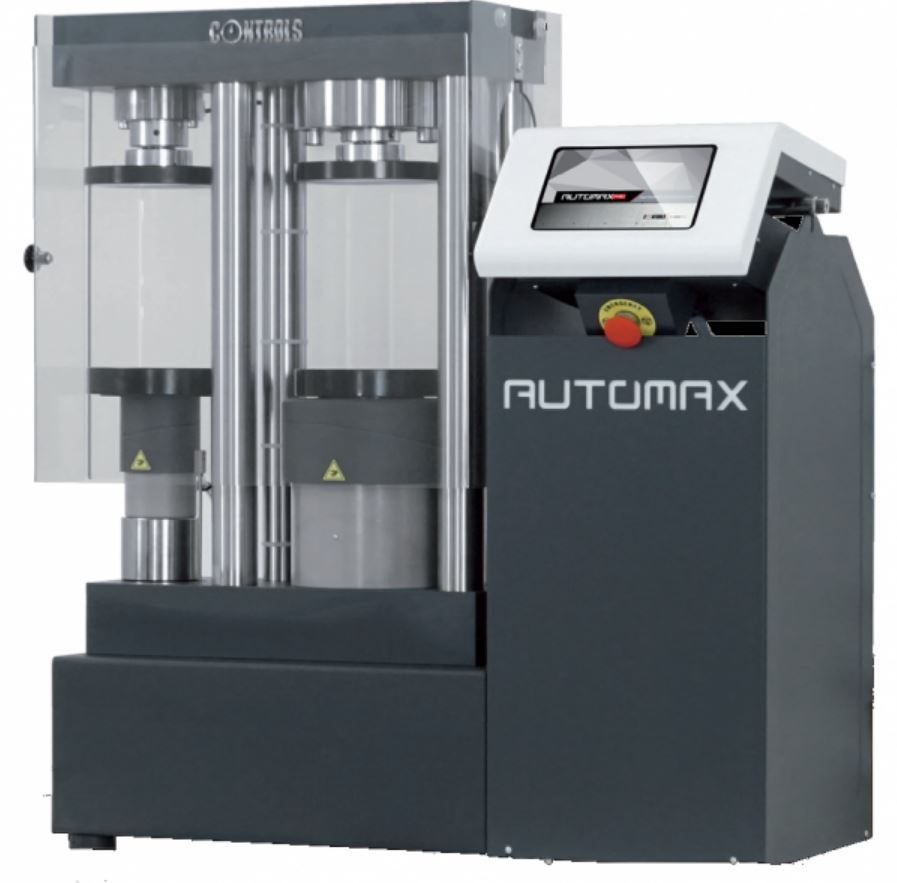
These machines, featuring a very rigid four columns frame, have been designed for the testing of the cement prism either in compression or in flexure.
Two versions are available:
65-L27F1x
models, double testing chamber, 15/300 kN cap., inbuilt flexural jig for 40x40x160 cement prisms and compression apparatus for portions of 40x40x160 mm prisms broken in flexure.
Conforming to EN 196-1, 1015-11.
65-L28F1x
models, double testing chamber, 15/300 kN cap., fitted with round platens for testing in compression and flexion cement, mortar, resins and other materials.
Conforming to EN 196-1, 1015-11, ASTM C109, C348, C349 using the suitable accessories.
65-L18F1x
models, 300 kN cap., fitted with round platens for testing cement, mortar, resins and other materials and other materials.
Conforming to EN 196-1, 1015-11, ASTM C109, C349 using the suitable accessories.
65-L38F1x
models, 300 kN cap., fitted with round platens for testing cement, mortar, resins and other materials featuring increased vertical and horizontal daylights.
Conforming to EN 196-1, 1015-11, ASTM C109, C349 using the suitable accessories.
All models are fitted with high accuracy load cell/s or load measurement
Models fitted with compression platens 165 mm dia. (65-L28F1x, 65-L18F1x) have a vertical span of 200 mm hence can house all standard accessories for cement and mortar testing (see accessories) and furthermore can be used to test other specimens directly on the standard compression platens adjusting, if necessary, the vertical daylight, with the suitable distance pieces (see accessories).
Model 65-L38D1x features increased vertical and horizontal dayligths to allow different kind of test, for example it’s possible to perform flexural test on concrete beams with suitable accessory, see Flexural test device for concrete beams
Compression platens can be supplied complete with Platen surface hardness certificate. See upgrading option
Automax PRO, Automatic power and control system
See technical specifications.
Safety features
Includes: Max. pressure valve to avoid machine overloading; piston travel limit switch; emergency stop button; front door and rear transparent fragment guard on request, see Upgrading Options.
Technical Specs
UTOMAX PRO AUTOMATIC POWER AND CONTROL SYSTEM
Hydraulics
- DC motor, 720W, 50-60Hz
- Maximum working pressure 700 bar
- Load/unload electrovalve for test execution via display/PC and automatic stop at specimen failure
- Active control of up to 4 frames by selection via display/PC (third and fourth frame as option). See accessories.
- ES Energy Saving technology to reduce the power consumption and enable silent operation
Hardware
- 524,000 points high-resolution/stability analog channels
- 4 channels for load sensors
- Control frequency 250 Hz
- Sampling frequency 250 Hz
- 7”, 800 x 480 pixel, 16 M colors, icon-driven capacitative sensing touchscreen graphic display
- Unlimited storage capacity for test data on internal 8 GB SD card
- USB port for test data storage on external USB memory stick and for firmware upgrade
- Ethernet port for PC / Internet /network communication
- Optional integrated graphic printer including Load-Time plot
- RS 232 port for data downloadingin ASCII format
- Wi-Fi or GSM module available as option
Firmware
- Execution of compression, flexure tests in automatic mode with load rate controlled by a closed-loop P.I.D. system
- Execution of loading ramps with the possibility to manually increase or decrease the test speed during the test
- Possibility to reach at controlled speed a load target and to keep a steady loading phase.
- Simultaneous display of load, specific load, actual load rate, load/time graph
- Zoom option on the test graph
- Saving of the specimen failure type (to EN or ASTM) in the test results
- Download data to internal printer (optional) or to PC via RS 232 port or to USB memory stick
- PC / network communication via Ethernet
- Multi-coefficient linearization of the calibration curve for better accuracy at low loads thus avoiding the use of a second pressure transducer
- Recording facility for up to 10 test profiles for each channel including: type of test (e.g. compression, flexural, indirect tensile), specimen size and shape, load rate, test standard and other general information. Each one of the recorded test profiles can be recalled automatically to save time
- Improved PID algorithm and Multi PID selection. Up to 3 different PID settings can be tuned for a variety of materials (ACV, flexure, compression with neoprene pads, etc.)
- Compatible with the newly released Datamanager software, tailored for construction material testing laboratories, for real-time data acquisition, display and management
- Peripheral devices integration and web services available as option (see page…)
- Automatic load measurement verification procedure, by connecting suitable load cells and our digital readout unit to PC
- Language selection (including Cyrillic and Chinese)
- Unit selection (kN, ton, lbf)
- USB port for firmware upgrade and safe backup of the original configuration data (PID, calibration, etc.), in case of loss and/or data corruption. The restore of the machine to the factory settings is easy avoiding the need of any technical support.
| Models 65- | L27F12 L27F14 |
L18F12 L18F14 |
L38F12 L38F14 |
L28F12 L28F14 |
| Max. Load kN | 15/300 | 300 | 300 | 15/300 |
| Load measurement by | Load cells | Load cell | Load cell | Load cells |
| Ram travel mm | 30/50 | 50 | 50 | 30/50 |
| Vert. span mm | 50 | 200 | 350 | 200 |
| Horiz. span mm | 220 | 220 | 260 | 220 |
| Platen dim. mm | 40×40 | Dia. 165 | Dia. 165 | Dia. 165 |
| Flexural jig 40x40x160 mm | included | – | – | – |
| Overall dim. mm lxgxh |
922×337 x964 |
862×344 x964 |
862×344 x1114 |
890×337 x964 |
| Weight approx kg | 260 | 215 | 228 | 266 |
| Class 1 measuring Range from kN: |
1.5 to 15 30 to 300 |
30 to 300 | 30 to 300 | 1.5 to 15 30 to 300 |
| Class 1 measuring range from kN:* | 0.75 to 15 3 to 300 |
3 to 300 | 30 to 300 | 0.75 to 15 3 to 300 |
*With the special calibration procedure, code 50-C0050/CAL for the 300 kN load scale and with the special procedure 50-C0050/CAL5 for the 15 kN load scale. To be specified at time of order.
Ordering Information
300kN compression testers
65-L18F12
300 kN cap., automatic compression tester for cement, mortar, resins and other materials using the suitable accessory. Load measurement by precision load cell. AUTOMAX PRO control system. Round compression platens 165 mm dia. 230 V, 50-60 Hz.1 ph.
65-L38F12
300 kN cap., automatic compression tester for cement, mortar, resins and other materials using the suitable accessory. Load measurement by precision load cell. AUTOMAX PRO control system. Round compression platens 165 mm dia. Version with increased testing space: vertical 350 mm, horizontal 260 mm.230 V, 50-60 Hz.1 ph.
300kN/15kN compression testers
65-L27F12
Double chamber automatic flexural-compression tester, 15/300 kN cap., inbuilt flexural jig for 40x40x160 mm prisms and compression apparatus for portions of 40x40x160 mm prisms broken in flexure to EN 196-1. Load measurement by precision load cells. AUTOMAX PRO control system.230 V, 50-60 Hz, 1 ph.
65-L28F12
Double chamber automatic compression tester, 15/300 kN cap., for cement, mortar, resins and other materials using the suitable accessory. Load measurement by precision load cells. AUTOMAX PRO control system. Round compression platens 165 mm dia. 230 V, 50-60 Hz, 1 ph.
Accessories
Compression devices for cement and mortars
Flexural test devices for mortar beams
Distance pieces to adjust the vertical daylight
Data manager PC software
Additional Information
The AUTOMAX PRO Super-Automatic cement testers, represent the more sophisticated and advanced evolution of the usual compression testers. This new and advanced system satisfies, first of all, the requirements for the automatic accurate and constant load rate application conforming to standards. The test cycle with closed loop digital feedback is automatically performed by simply pressing the start button. The other important innovation concern the “ES technology” which features the accurate oil flow control with no oil dispersion, silent operation, cold oil temperature and, finally, low energy consumption saving over the 30% energy compared to traditional systems.
The automatic test procedure, once the specimen has been positioned and centered and the machine switched on is:
- Set test parameters, including load rate, on the touch screen (can be avoided by default for repetitive tests)
- Press the start button on the touch screen
- The machine automatically starts the rapid platen approach, switches to the test speed once the specimen comes into contact with the upper platen and, finally, releases the pressure upon specimen failure
- Save the test including data results and load/time graph. The test execution conforming to standards can be easily proved.
Up-grading Options
Third frame facility
50-C10D/3F
Upgrading the Automax System for a third frame connection and control (expect 4000kN and 5000kN models). Frame selection via display/PC.
Graphic printer (To be factory installed)
50-Q60P/PR
Upgrading the AUTOMAX PRO to incorporate a serial graphic printer in the front panel allowing also load/time plot at the end of test.
Specifications:
– Very silent printing
– High speed: 50 mm/sec
– High resolution: 203 dpi=8 dots/mm
– Support test and graphic printing
– Easier maintenance with self-diagnostic
– Paper width: 57.5 mm
Safety fragment guard
65-L2701/P
Transparent rigid fragment guard for 65-L27D1x compresion testers and frames
65-L1800/P
Transparent rigid fragment guard for 65-L18D1x compression testers and frames
65-L2800/P
Transparent rigid fragment guard for 65-L28D1x compression testers and frames
Fragment guard locking switch.
50-L0050/P To prevent the test execution with the safety guard open. It has to be factory installed directly on the transparent fragment guard.
Platens surface hardness certificate
50-L0050/HRD
Traceable hardness certificate for platens 165 mm dia. Min. hardness 55,5 HRC.
Available only for ordering with the machine
50-C0050/HRD5
Traceable hardness certificate for platens 40×40 mm. Min. hardness 60 HRC.
Available only for ordering with the machine
Special calibration procedures
50-C0050/CAL
Special calibration procedure to obtain class 1 from 1% of the 600kN scale
50-C0050/CAL5
Special calibration procedure to obtainclass 1 from 5% of the 15kN scale


